Google Chrome browser is a popular browser and a strong competitor of Microsoft Edge browser. Both are built with chromium. In this article, I will show you how to deploy Google Chrome using Intune (a.k.a. MEM). Intune makes it easier to package and deploy Chrome browser to endpoints.
Application name
Download link
File extension
Google Chrome
https://chromeenterprise.google/download/
*.msi
Win32 Content Prep Tool
https://go.microsoft.com/fwlink/?linkid=2065730
*.zip/ *.exe
Steps and methods to deploy Google Chrome with Intune
Microsoft Intune supports a variety of app types and deployment scenarios on Windows devices. In this post, we use the Win32 apps deployment method. The high-level steps to deploy Google Chrome browser using Intune include:
Download the installer for Google Chrome.
Preparing applications for deployment in Intune.
Create a new application for Google Chrome in Intune Portal.
Assign or deploy Chrome browser to your computers managed by Intune.
When deploying any app using Microsoft Intune admin center, there are a few considerations to keep in mind:
Have a reliable internet connection because the Microsoft Intune admin center relies on cloud-based services for app distribution.
Ensure that your devices meet the minimum requirements for app installation, including the necessary operating system version and available storage space.
Consider the impact of Intune software deployment on device performance. Deploying too many applications at once or on devices with limited resources can decrease performance and affect user dissatisfaction.
Plan to test Intune app deployments on a subset of devices before rolling them out to the entire organization. This allows you to identify any potential issues and make adjustments as needed.
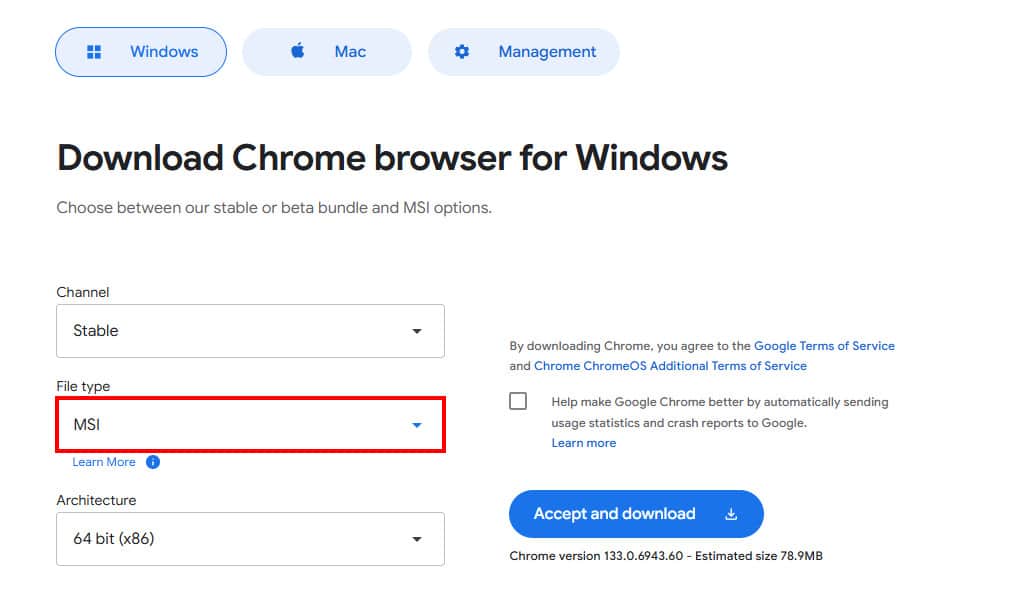
Download the installer for Google Chrome
1. You can download Google Chrome browser enterprise installer which is available as MSI installer. To download Chrome browser for your enterprise, visit the below download link:
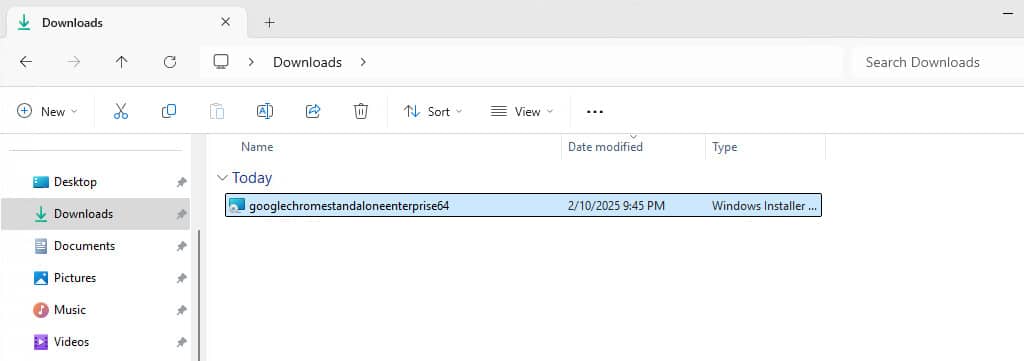
2. Click the Download button and save the googlechromestandaloneenterprise64.msi to your computer. We will use this installer to create a package for Intune in the next step.
Alternatively, you can use the Windows Package Manager to download the installer. The Windows Package Manager is a comprehensive package management solution pre-installed on Windows 11 and newer versions of Windows 10.
To download the installer for the Intune deployment. Let’s open PowerShell / Terminal or CMD as administrator then run the following command:
winget download --id Google.Chrome
As shown in the output, the direct download link can be obtained from the official website, and the downloaded file is saved in the Downloads folder.
# Output
Found Google Chrome [Google.Chrome] Version 133.0.6943.99
This application is licensed to you by its owner.
Microsoft is not responsible for, nor does it grant any licenses to, third-party packages.
Downloading https://dl.google.com/dl/chrome/install/googlechromestandaloneenterprise64.msi
  ██████████████████████████████   124 MB /  124 MB
Successfully verified installer hash
Installer downloaded: C:\Users\admin\Downloads\Google.Chrome_133.0.6943.99\Google Chrome_133.0.6943.99_Machine_X64_wix_en-US.msi
Preparing applications for deployment in Intune
Before deploying applications using the Intune admin center, you need to convert the app using the Microsoft Win32 Content Prep Tool. The tool allows you to wrap your applications in an Intune-specific container, which will have an .intunewin file extension. This process ensures that the applications are secure and can be easily managed and distributed through the Intune admin center.
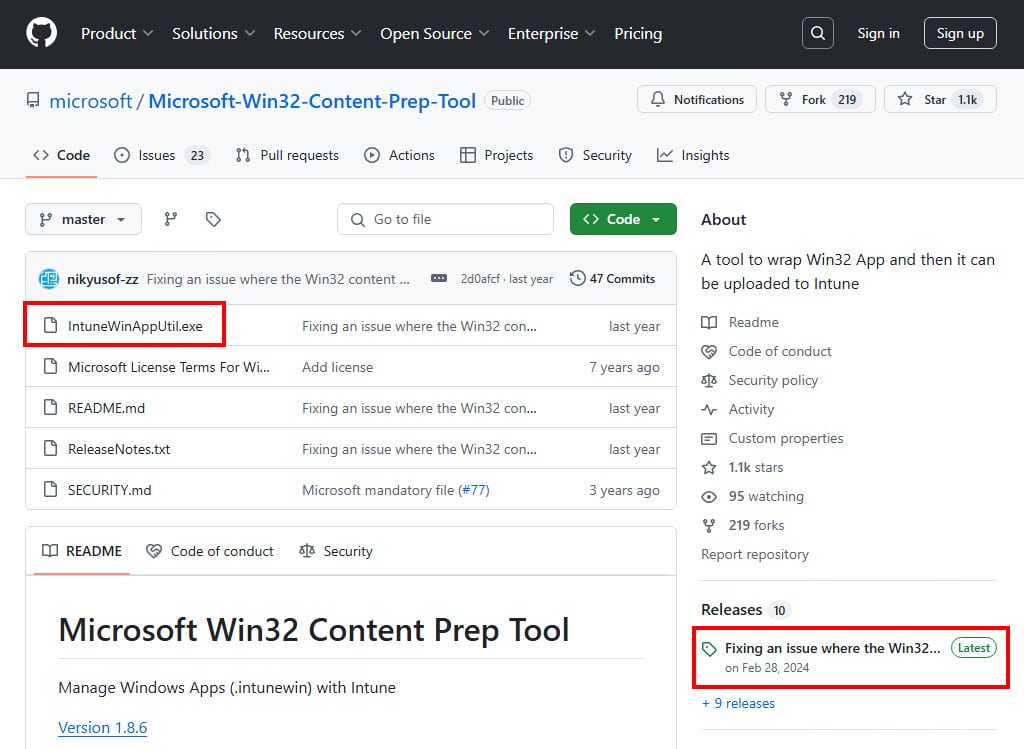
1. Download the Microsoft Win32 Content Prep tool from Microsoft’s official GitHub repository. This tool is essential for converting any app installer files into .intunewin format, suitable for Intune.
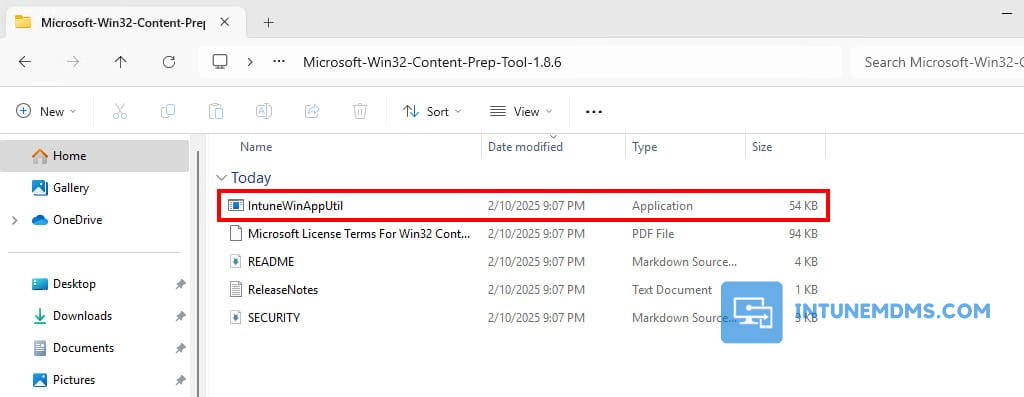
2. Download the file IntuneWinAppUtil.exe or download the source code as a zip file then extract the downloaded file to your computer.
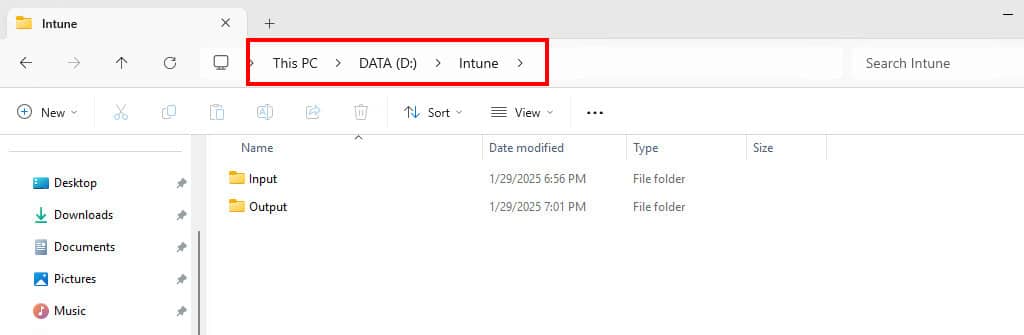
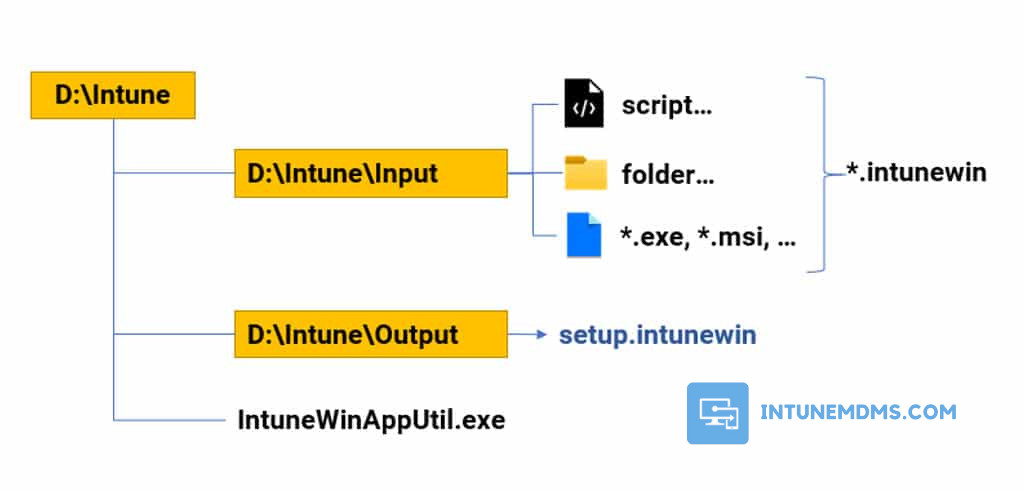
3. Next, you need to organize your files. Create a dedicated folder and subfolders for better management of the original and converted files.
D:\Intune
The root folder for package creation
D:\Intune\Input
All files and folders will be compressed into a single .intunewin file format
D:\Intune\Output
Output folder where zipped intunewim file will be created (setup.intunewin)
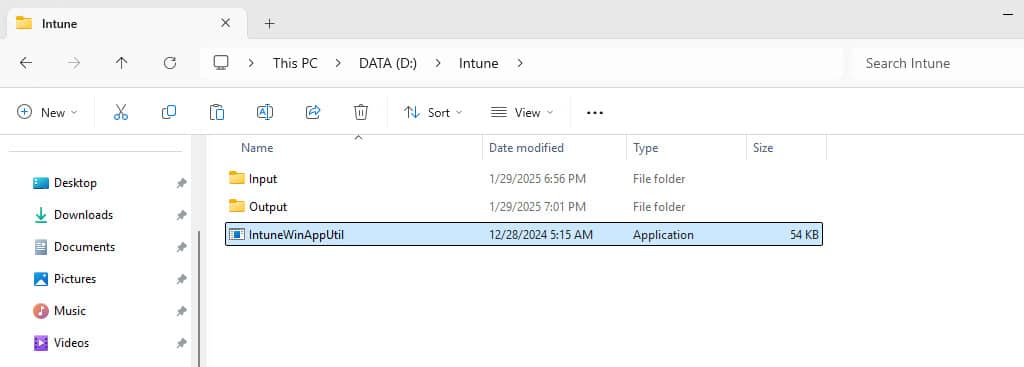
4. Copy the file IntuneWinAppUtil.exe → D:\Intune folder. Ensure that the file is located at the same level as the Input and Output folders. The Intune Win32 Prep Tool zips all files and folders when it creates .intunewin file. Hence, it’s important to not keep the tool in the Input (Source) folder. Else, the tool will also include in the application installation package.
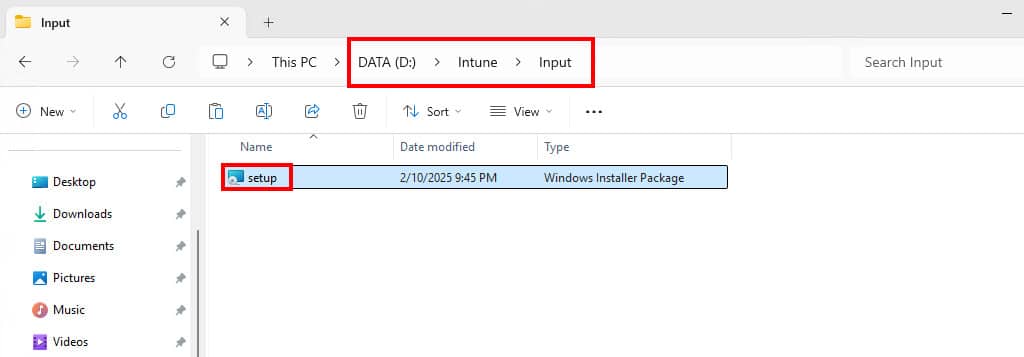
5. The next step, copy the *.msi installer that you downloaded in the first step to the D:\Intune\Input folder, then rename it to setup.msi.
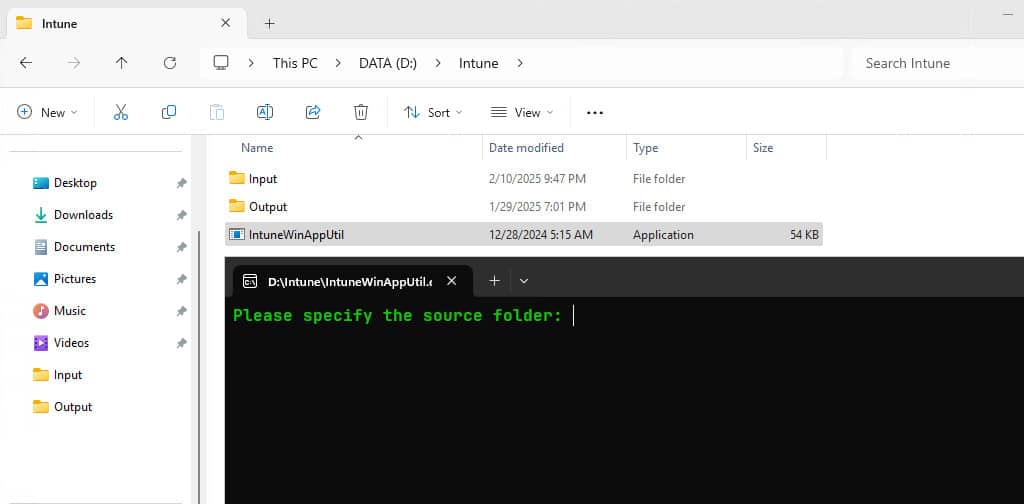
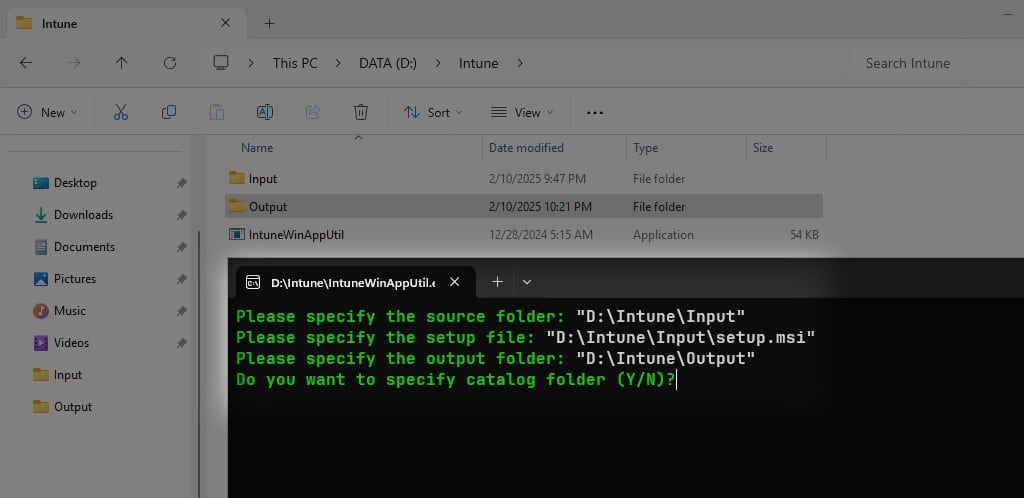
6. Next, go back to the D:\Intune folder, double click on the file IntuneWinAppUtil.exe to run the IntuneWinAppUtil tool. The screen should look like a Command Prompt. Or you can run the tool from the command window (Terminal, PowerShell or Command Prompt).
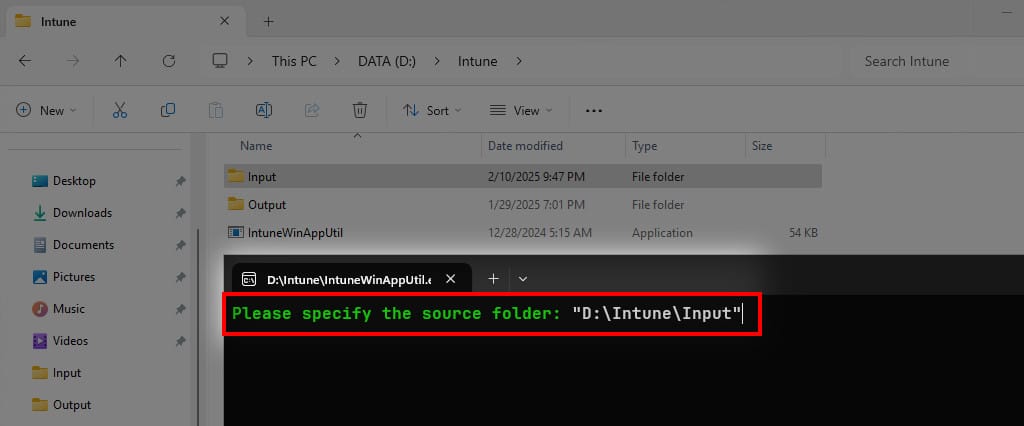
7. Please specify the source folder: Enter the full path of the Input folder (“D:\Intune\Input”).
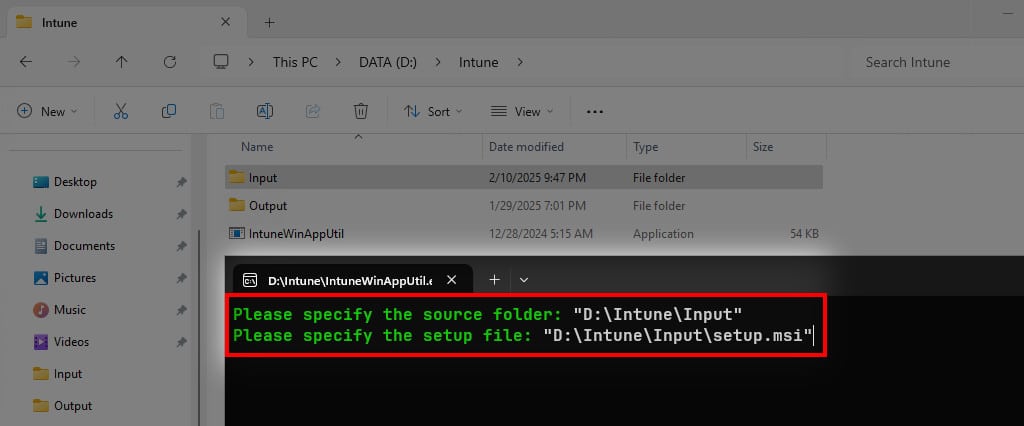
8. Please specify the setup file: You need to enter the full path of the MSI installer in the Input folder. For example: “D:\Intune\Input\setup.msi”.
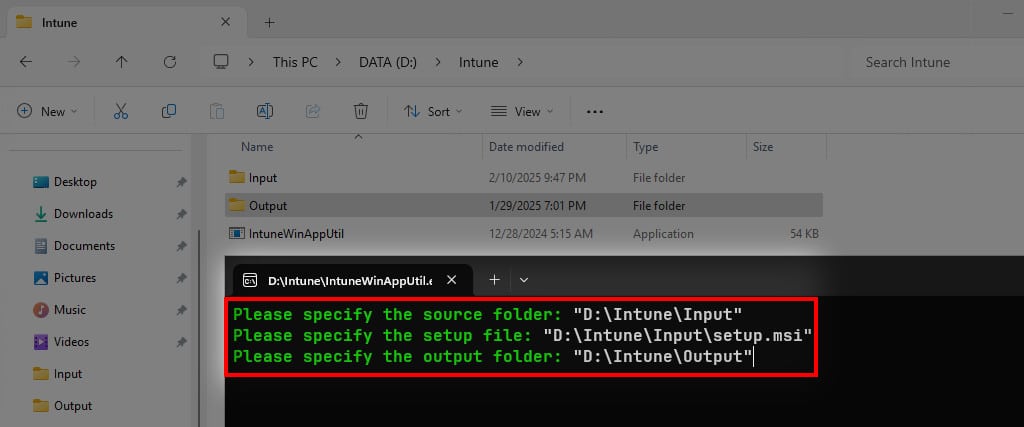
9. Please specify the output folder: Enter the full path of the Output folder you’ve created earlier. For example: “D:\Intune\Output”.
10. Do you want to specify catalog folder: Decide whether to specify a catalog folder. It is not necessary, so press Enter to proceed.
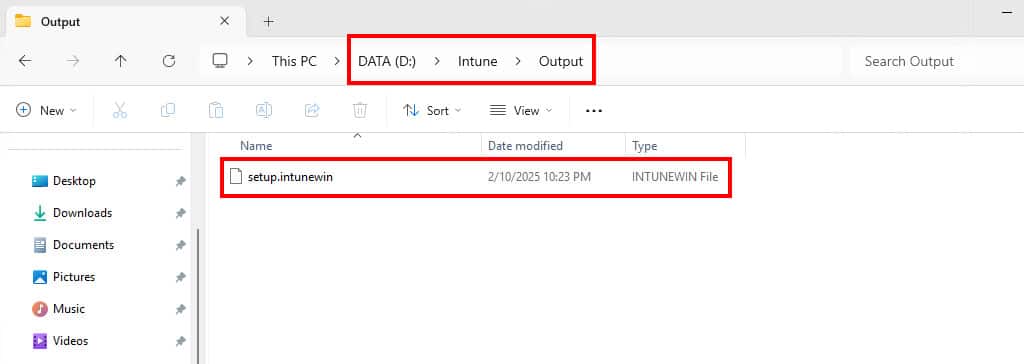
11. The tool is now performing its task, creating an Intune package for us. Once completed, it will close automatically. Browse to the output folder, and we see an .intunewin file is ready.
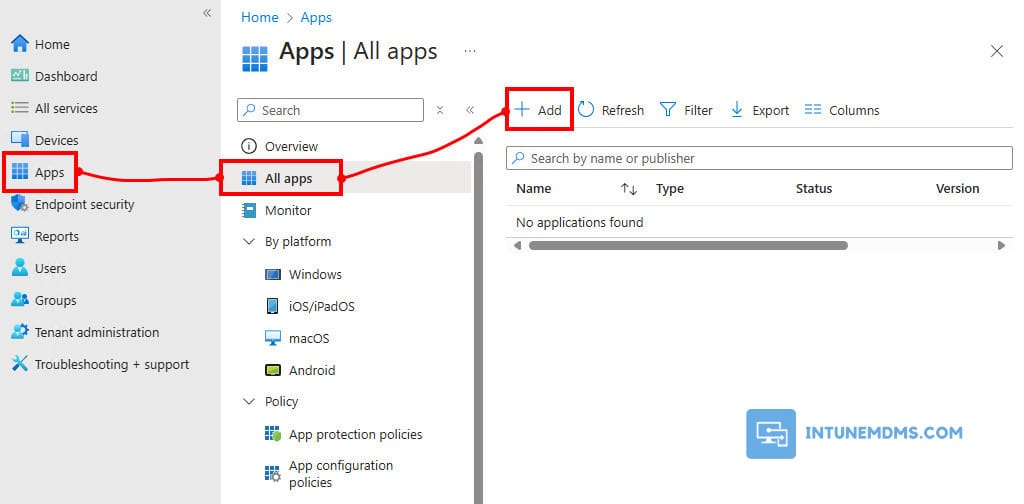
Create a new application for Google Chrome in Intune Portal
Once the Win32 app content is ready, the next step is to upload it to Intune. Use the following steps to upload Win32 app to Intune:
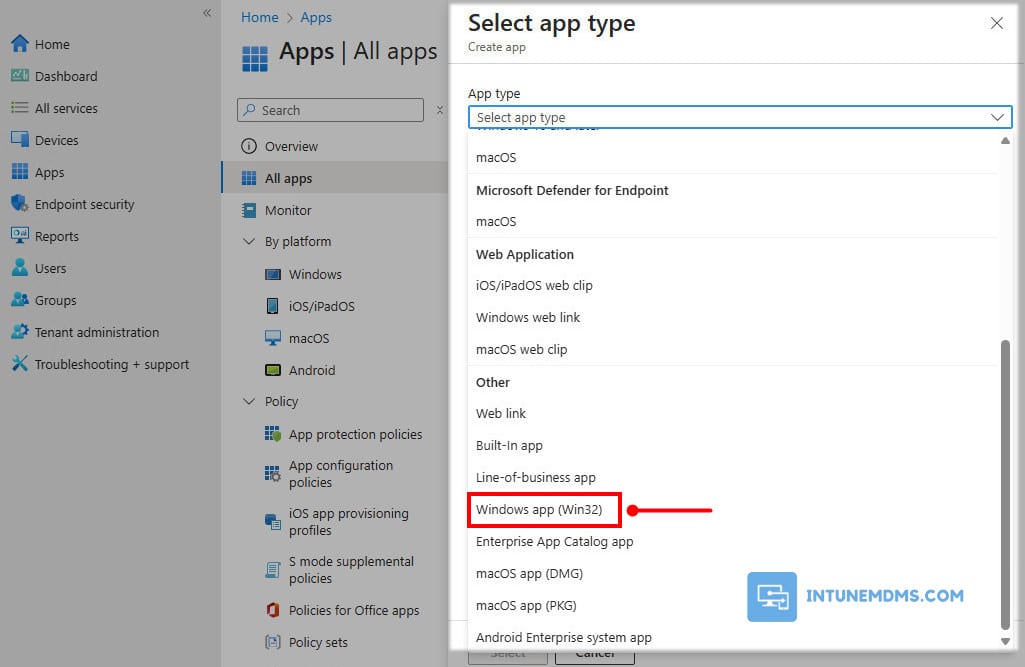
3. On the Select app type pane, under the Other app types, select Windows app (Win32).
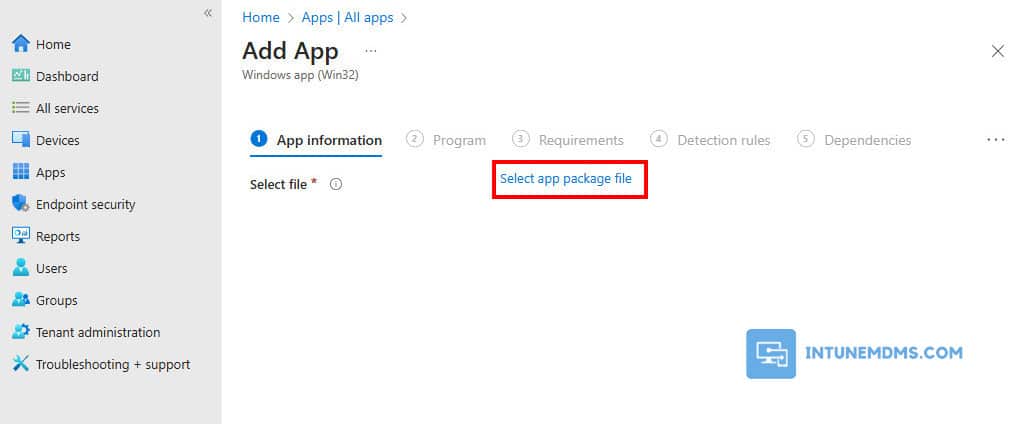
4. In the App information, click on Select app package file link.
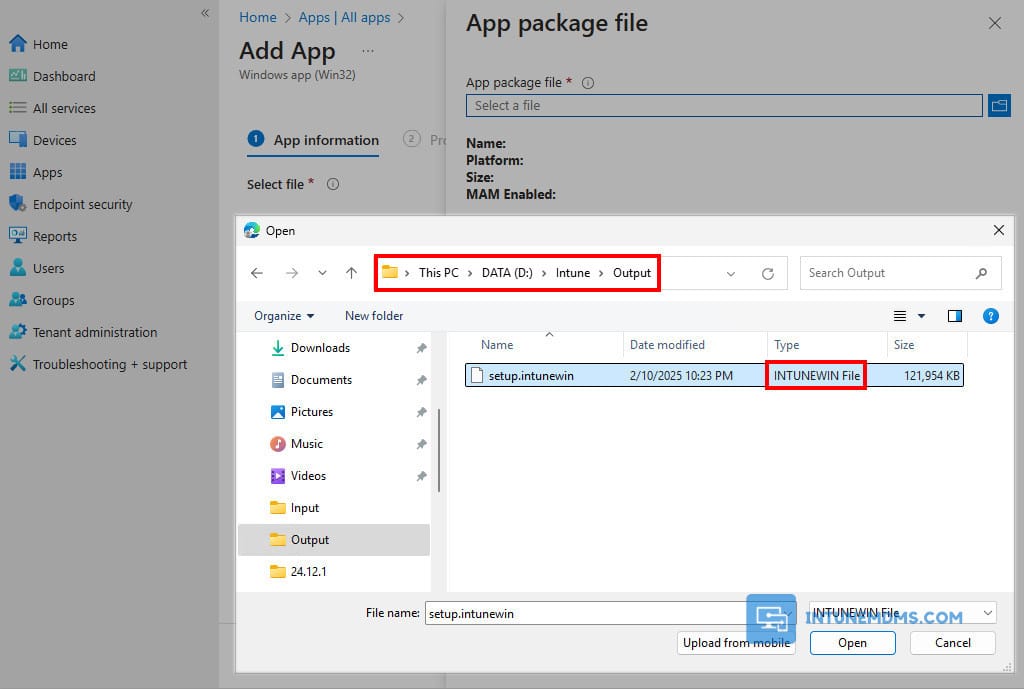
5. In the app package file pane, select the browse button. Then, select the intunewin file that you’ve created in the previous steps in the D:\Intune\Output folder.
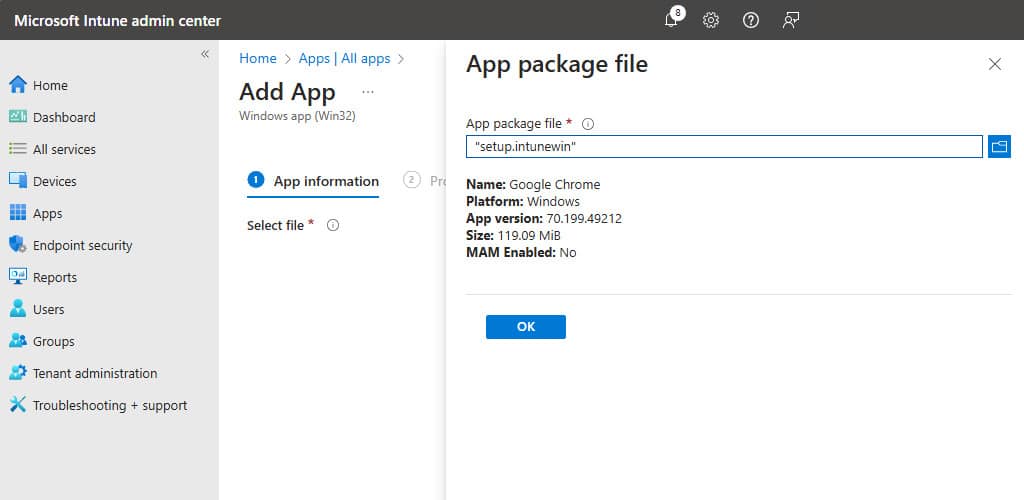
6. After uploading the file, you will see some information including the name of the app, the version, and other useful information. Go ahead and click OK to continue.
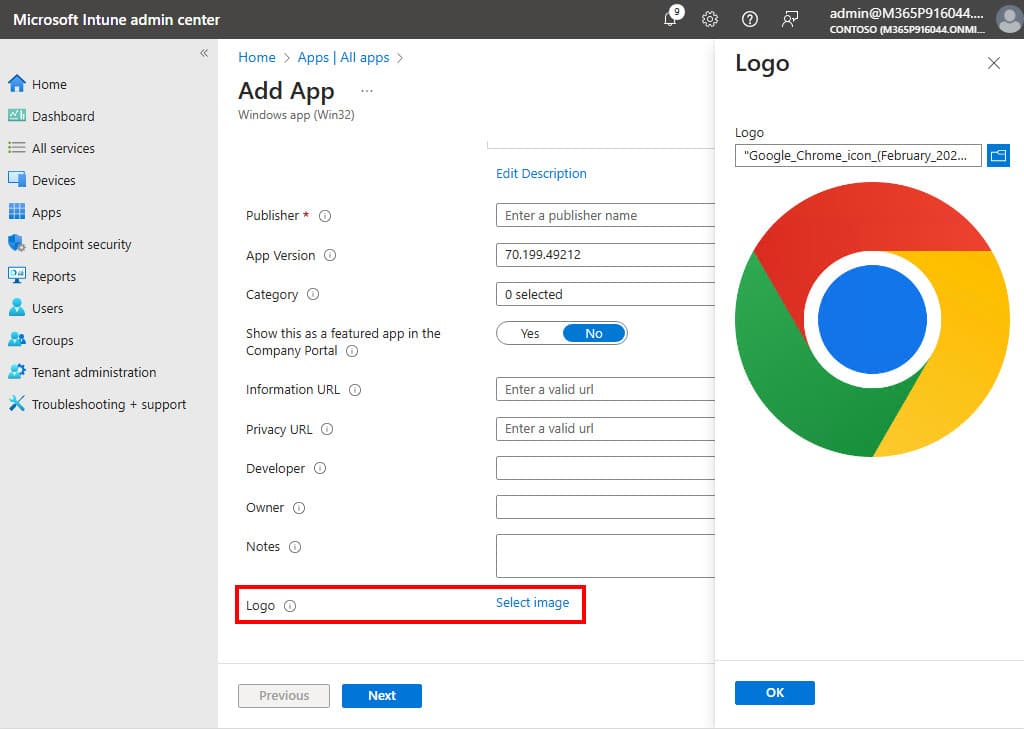
7. Once you press OK, you will see some information and be able to make a few adjustments. You can change the name of the app, description, add the publisher, and the category.
8. The last optional option is to specify the application logo. This icon is displayed with the app when users browse through the company portal. We recommend specifying the logo here because it makes easy for users to identify the applications via the logo.
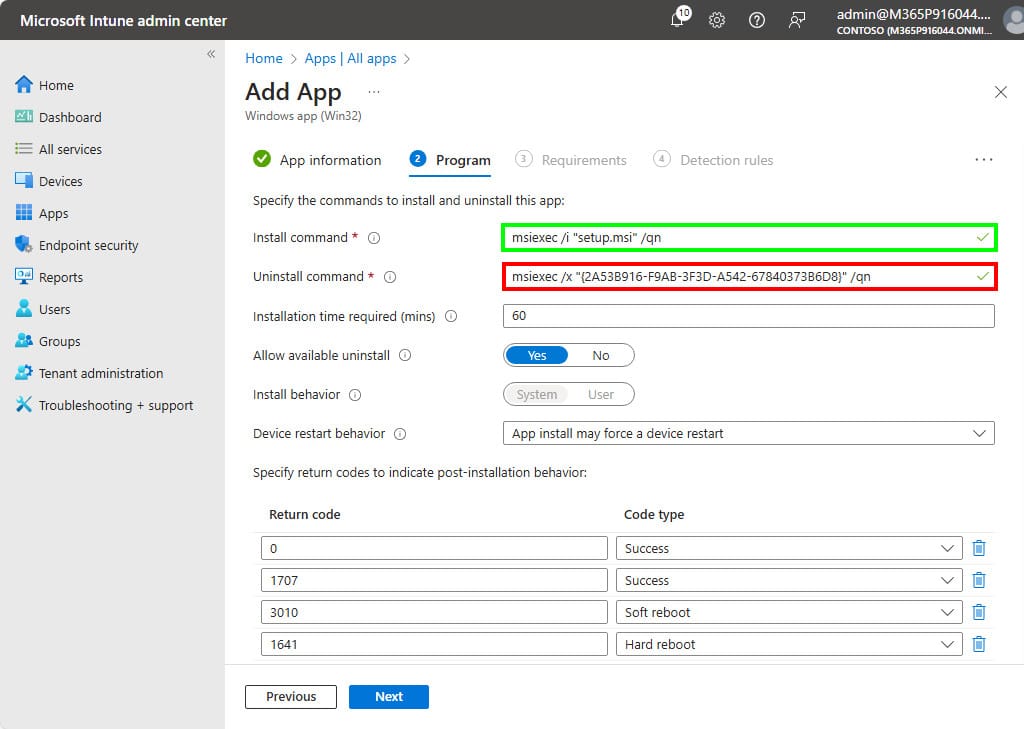
9. Next, you will see the Program page and can specify how the application will get installed on devices. With .MSI packages some of the install and uninstall commands will already be prepopulated. Click Next when done.
Install command – Installation command line used to install app.
Uninstall command – Command used to uninstall the app.
Allow available uninstall – Click Yes or No to allow users from uninstalling the app in the company portal.
Install behavior – If you select System this app will be installed for all users on a device. If you select User, the app will be installed for the user that is logged in.
Device restart behavior – You can choose the behavior of the device once the application has successfully downloaded. In my case, I will allow the App installation to force a device to restart.
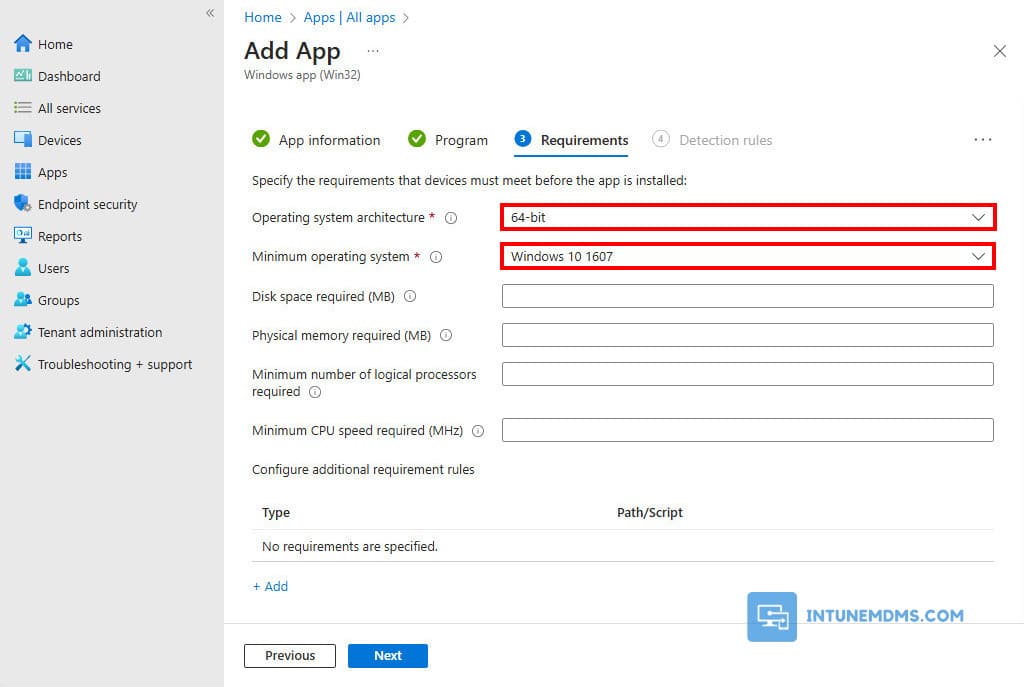
10. Requirements: In the Requirements page, specify the rules for the app to be installed on the device. I am going to require 64-Bit for Operating System architecture and Minimum operating system of Windows 10 1607. Specify the best choices based on your company’s needs.
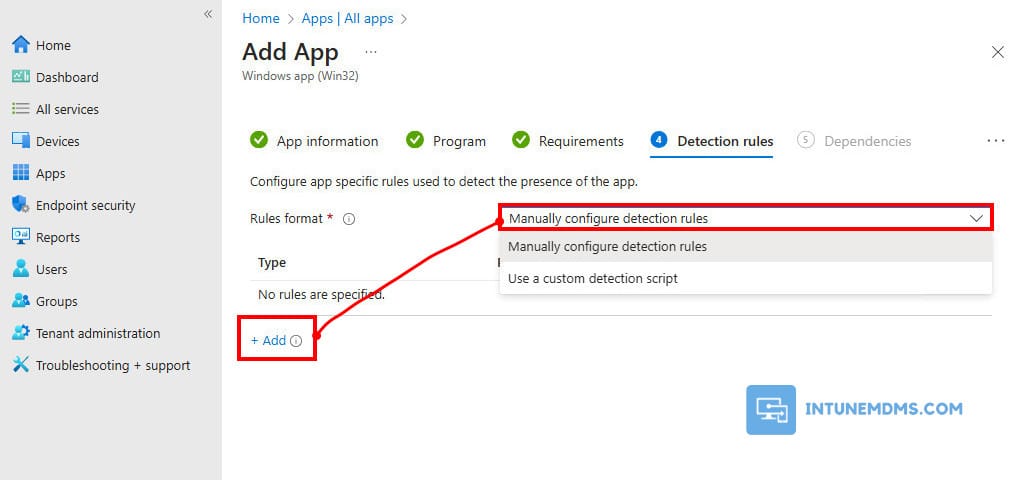
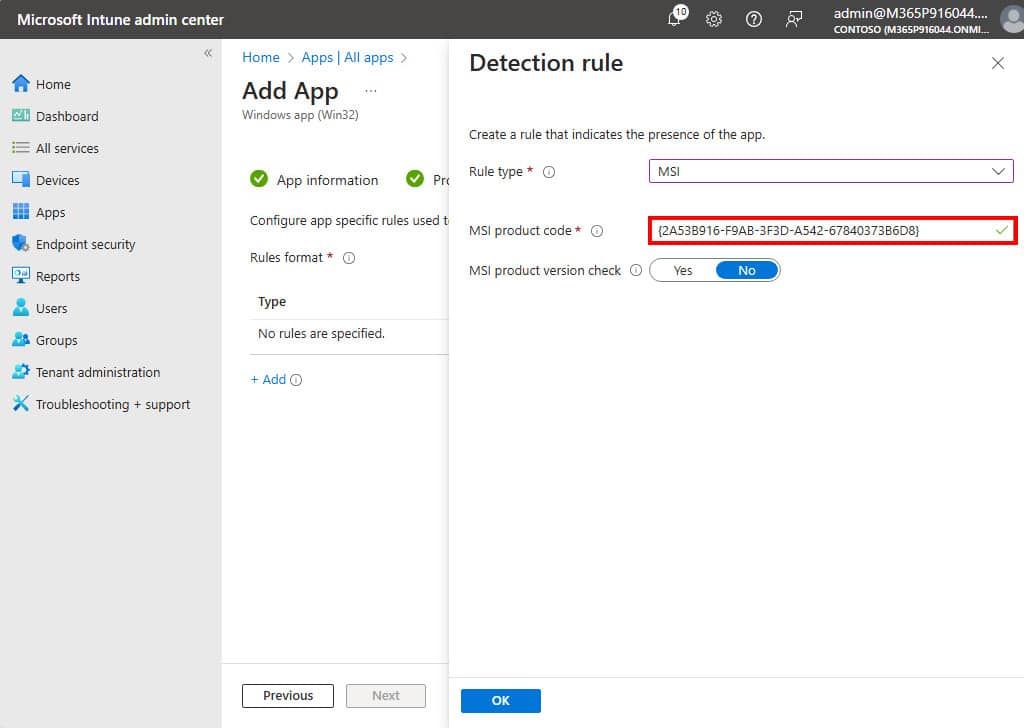
11. Detection rules: The detection rules allow us to verify whether the application being deployed is already present on the device. If the application version is already on the device, it will not install. However, if nothing is detected, it will proceed with the deployment.
There are two options: one is to manually configure detection rules, and the other is to use a custom detection script. I will choose to manually configure detection rules → + Add.
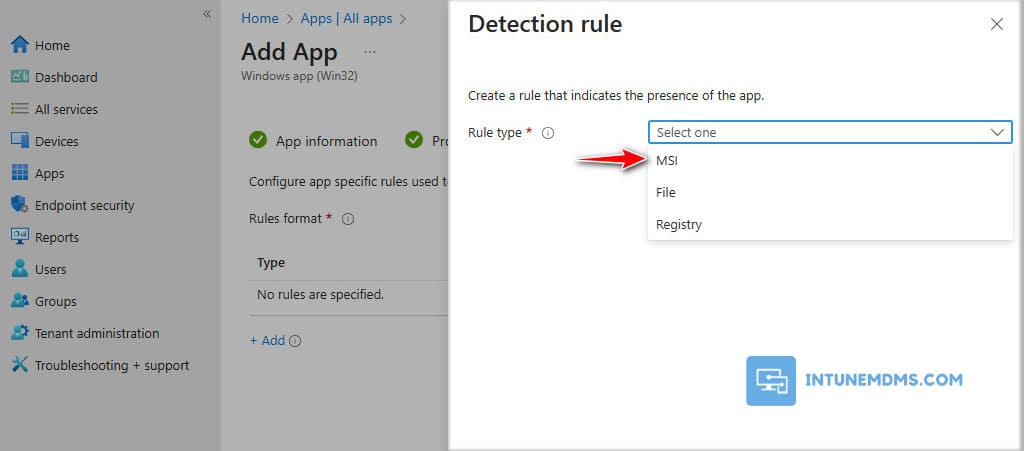
12. There are three types of rules to choose from: MSI, File, and Registry. Since an MSI package was used, it will automatically populate the MSI product code. Therefore, let us proceed by selecting MSI.
13. The MSI product code is populated automatically, however, if you don’t see it, add it manually. For MSI product version check, we are going to select No.
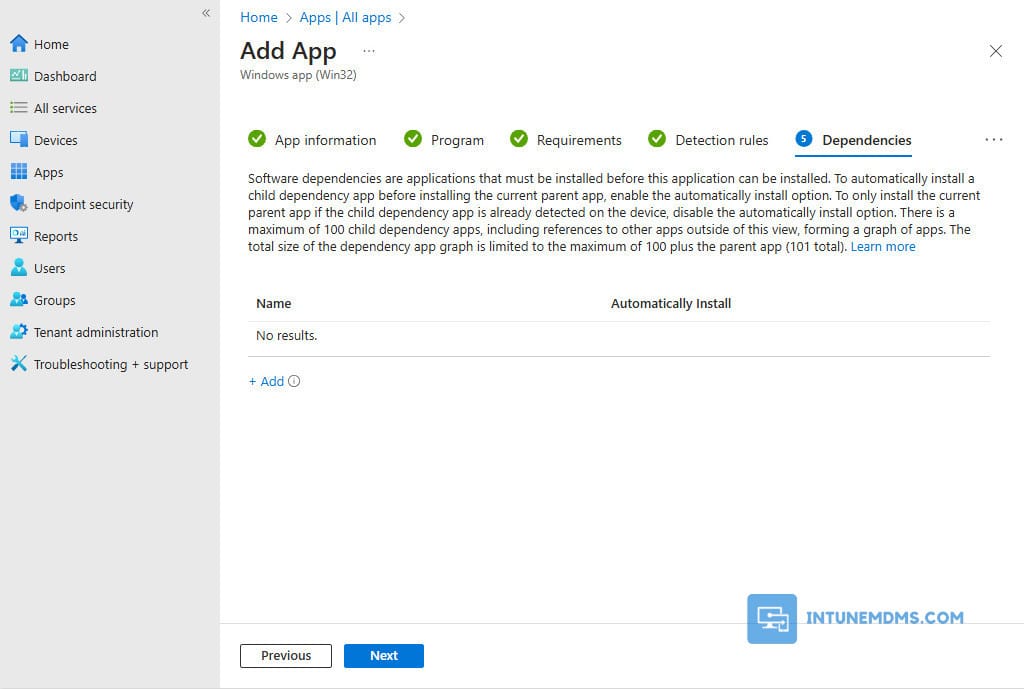
14. Dependencies: You can specify app dependencies where the applications that must be installed before your app can be installed. In this case, I am selecting no dependencies.
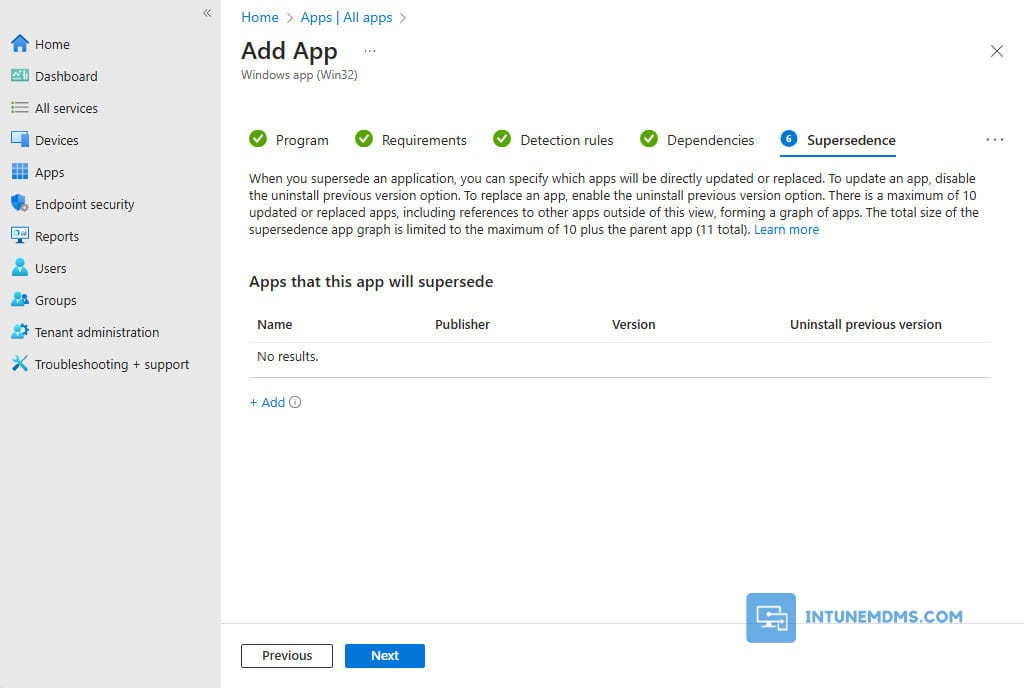
15. Supersedence: When you supersede an application, you can specify which app will be updated or replaced. To update an app, disable the uninstall previous version option. To replace an app, enable the uninstall previous version option. In this case, we are not going to configure anything.
Deploy Chrome browser to the computers managed by Intune
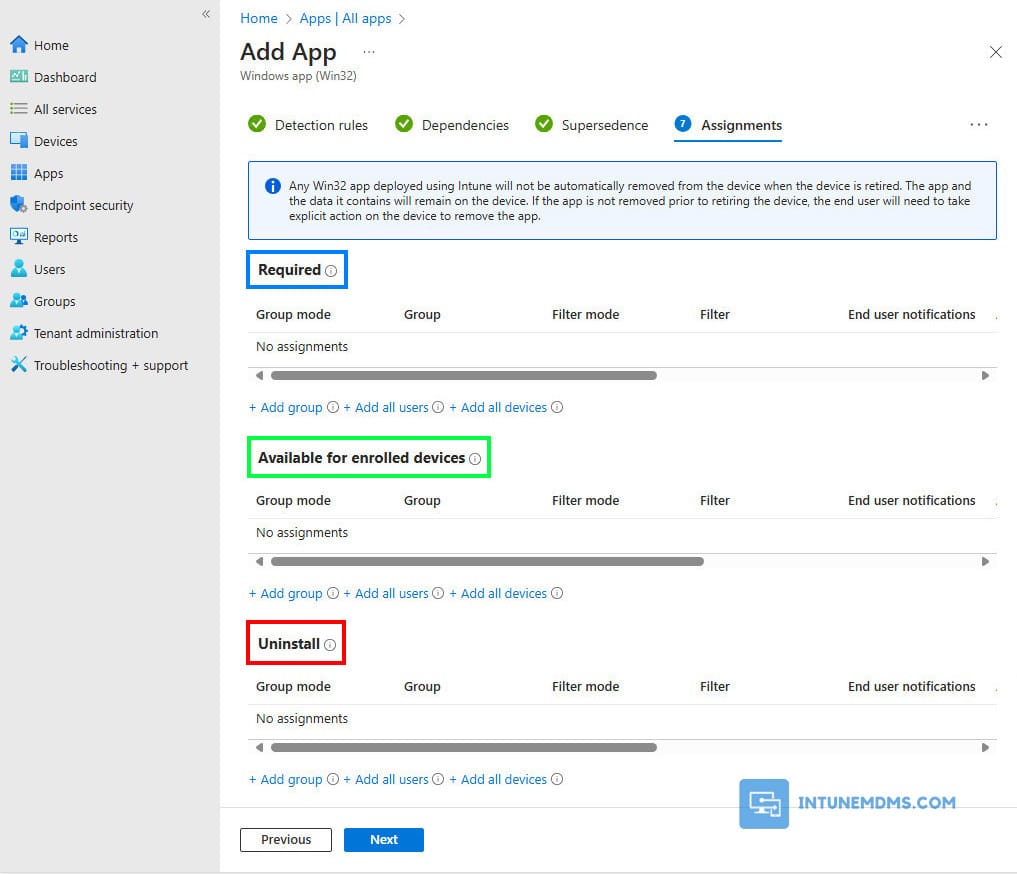
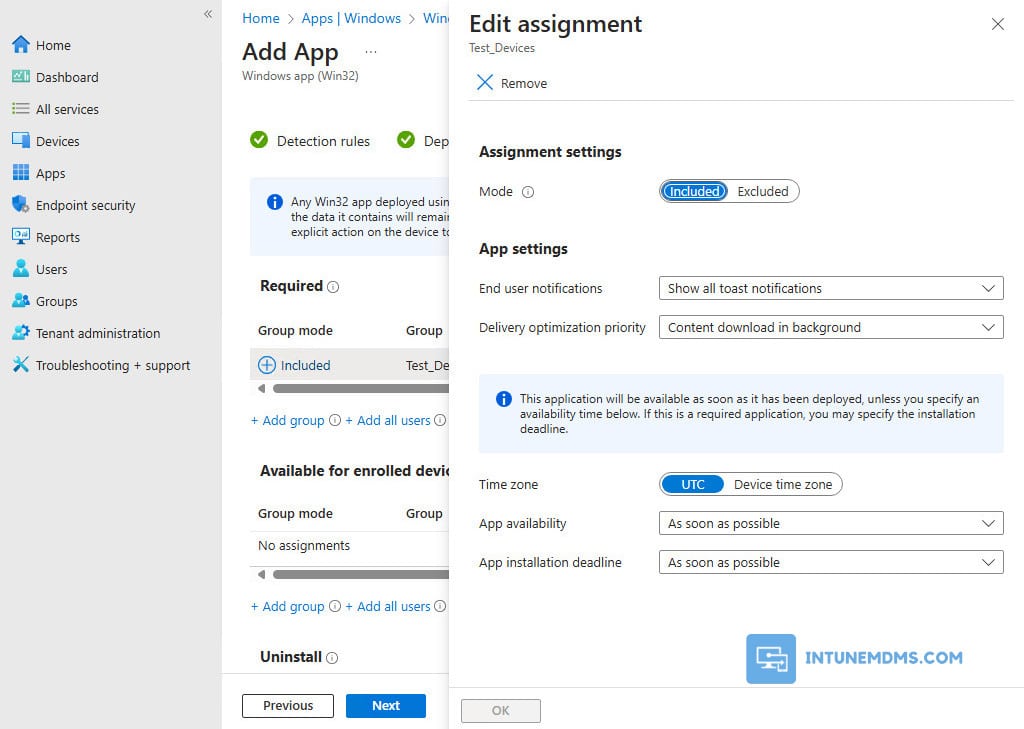
1. On the Assignments tab, you can select the Required, Available for enrolled devices, or Uninstall group assignments for the app. The options are explained below:
Required: The Win32 app is installed on devices in the selected groups.
Available for enrolled devices: Users install the Win32 app from the company portal app.
Uninstall: The Win32 app is uninstalled from devices in the selected groups.
Note: Please test the Intune app deployments on a subset of devices before rolling them out to the entire organization.
2. After you select your groups, you can also configure End user notifications, Availability, and Installation deadline for the app.
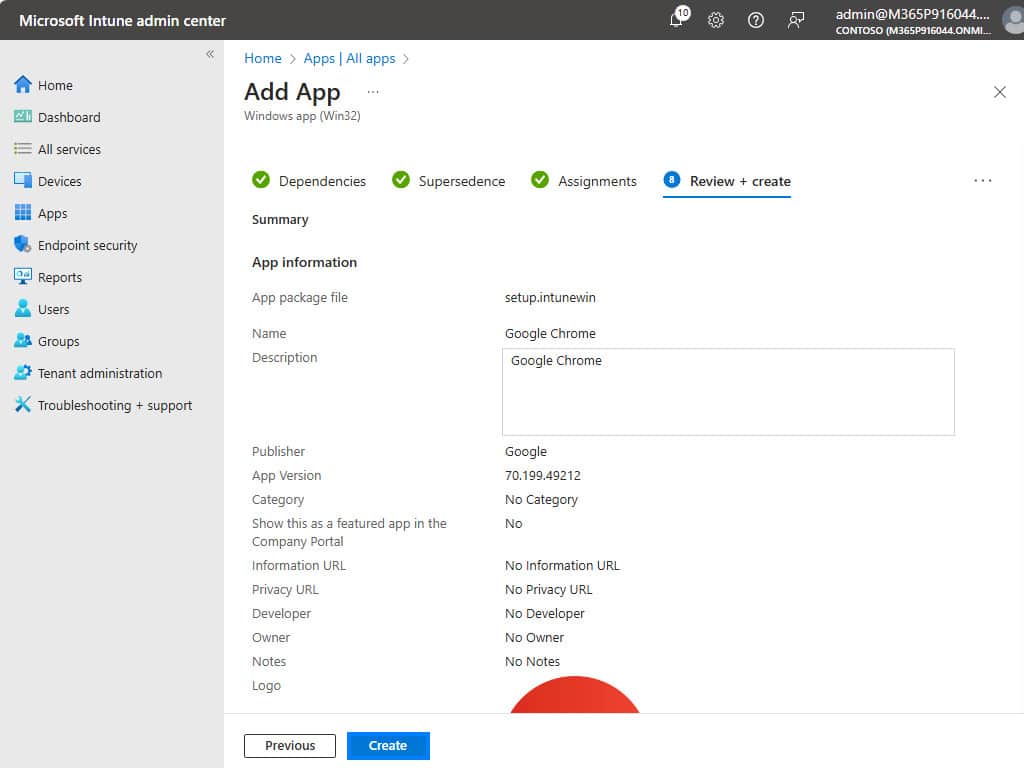
3. On the Review + Create tab, go through the values and settings that you entered for the app. Verify that you configured the app information correctly. Select Create to add the app to Intune.
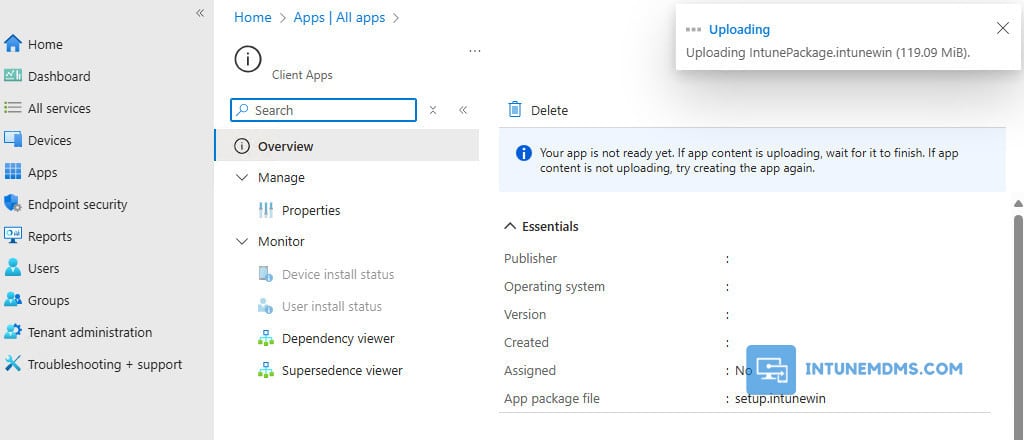
4. In the top-right corner of the Intune portal, you will see a notification that the application is being uploaded. If app content is uploading, wait for it to finish.
5. After a few minutes, you will see that the app upload has finished and the deployment is ready. The application has been targeted to the devices.
Tracking the app deployment in Microsoft Intune
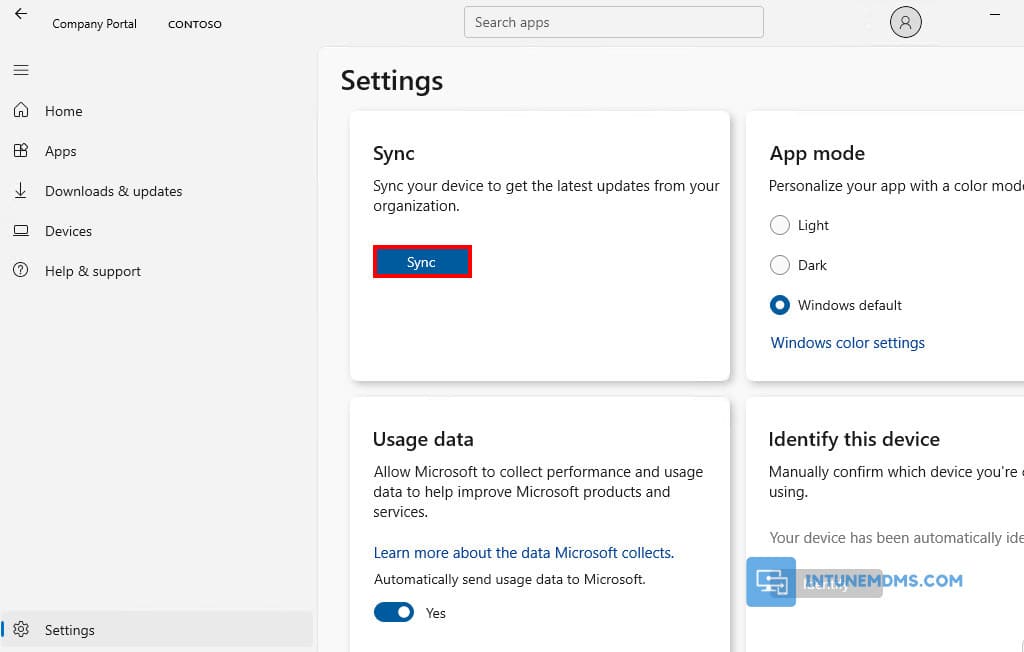
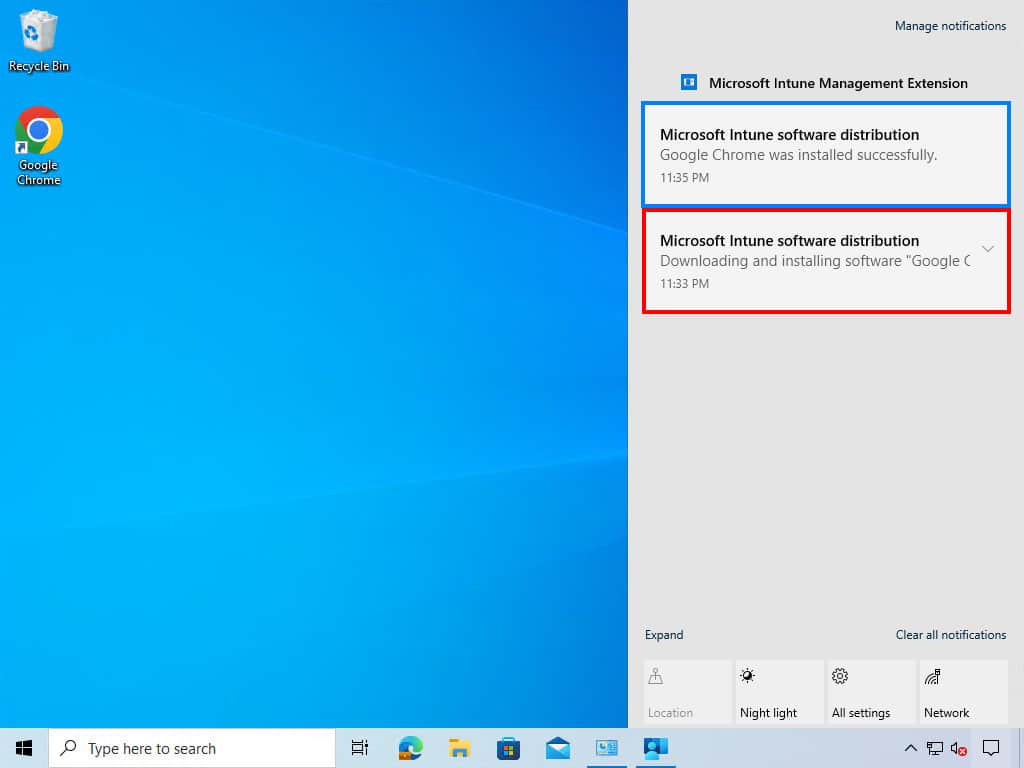
1. To verify the development, login to a managed system, allow some time to sync the device. Or you can force the sync from the Windows Settings or the Company Portal app.
2. On a device, you can check the system notifications to see if the app has been installed successfully.
Once the app is deployed, you can monitor its deployment status and track installation progress. Intune provides detailed reports and logs, allowing you to troubleshoot any deployment issues and ensure successful app installation.
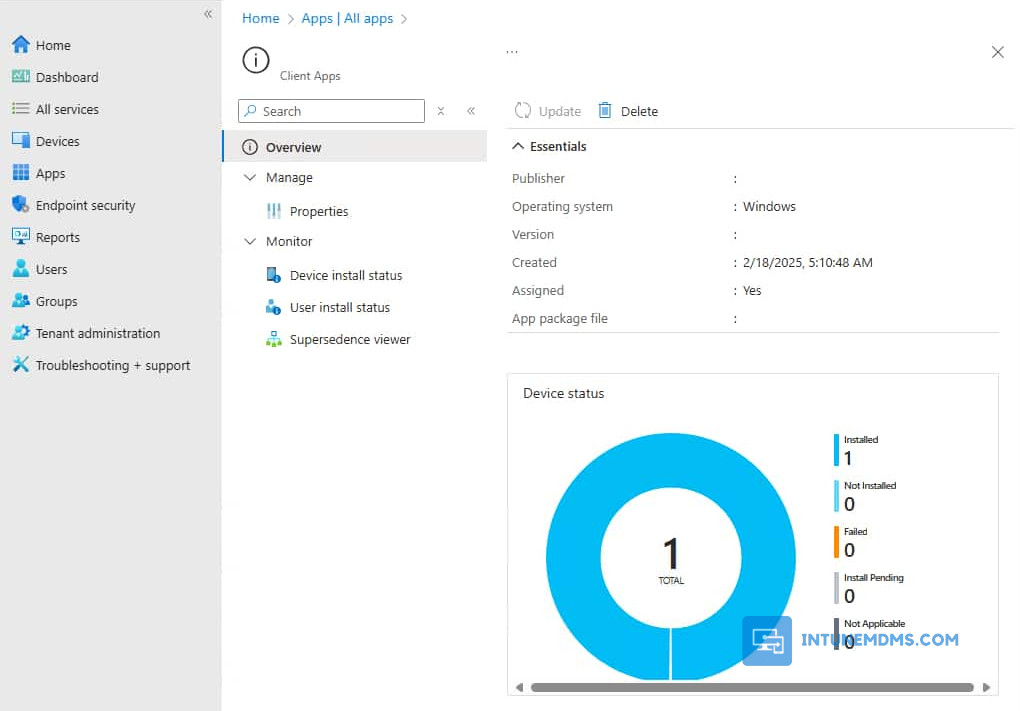
3. To check the app deployment status within Intune portal, go to the Apps section and select the app from the list. The Device Status shows the devices that have installed with the app.
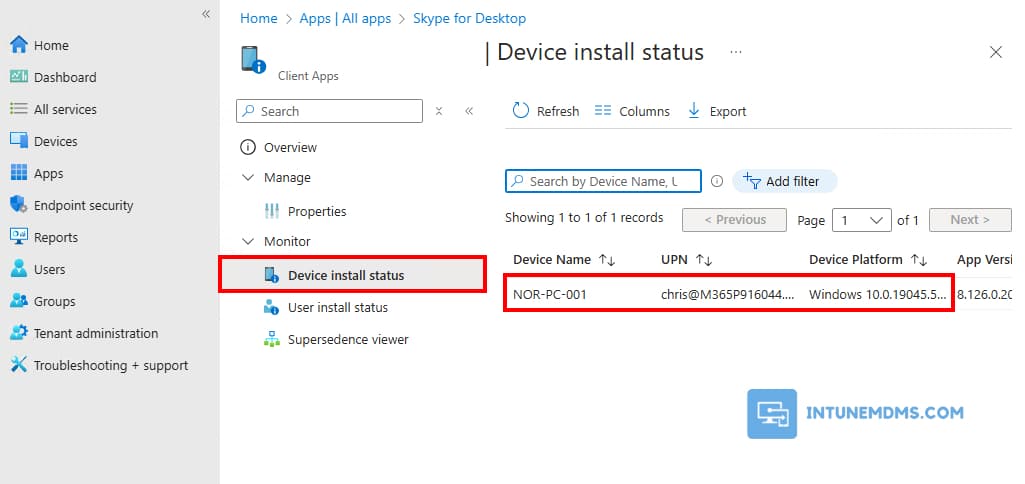
4. Click on Device install status or User install status, we will be able to see list of devices or users with installation status shown.
Uninstall Google Chrome using Microsoft Intune
Anytime, if the app is no longer needed. You can uninstall it using Intune automatically.
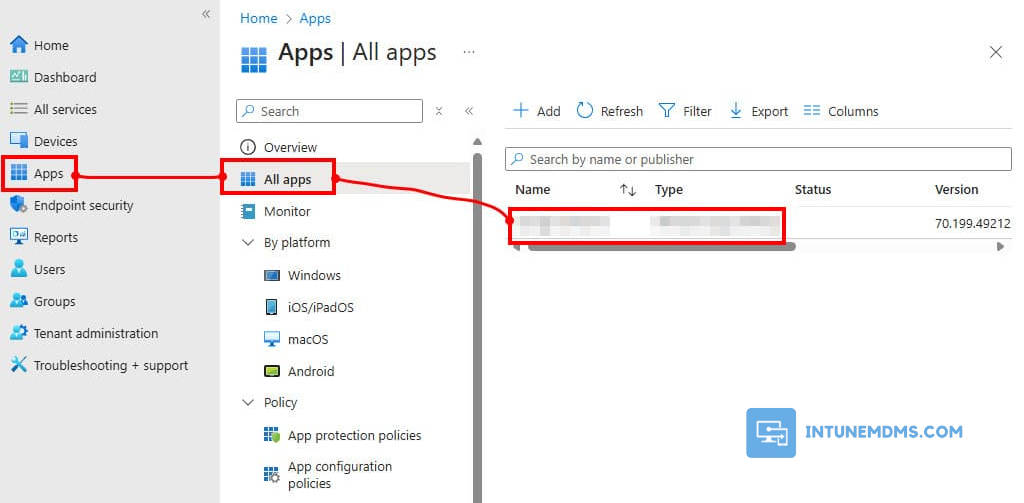
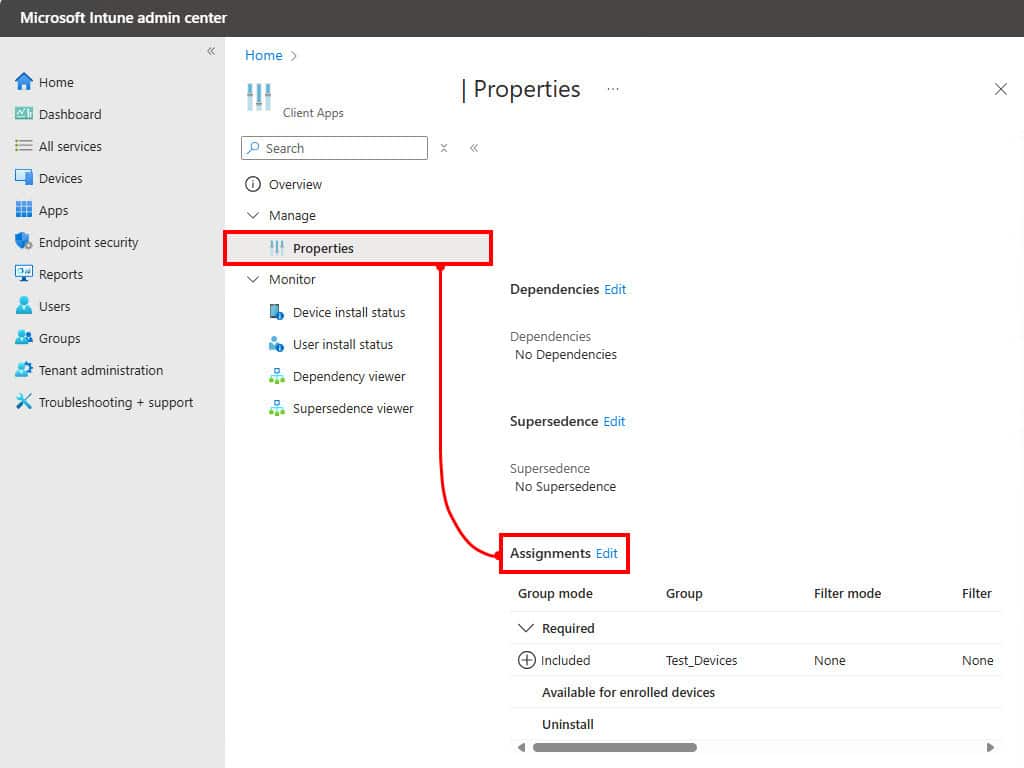
1. Log in to the Intune admin center, then navigate to Apps → All apps then select the app you want to remove from Intune remotely.
2. Go to Properties → Click on Edit next to Assignments
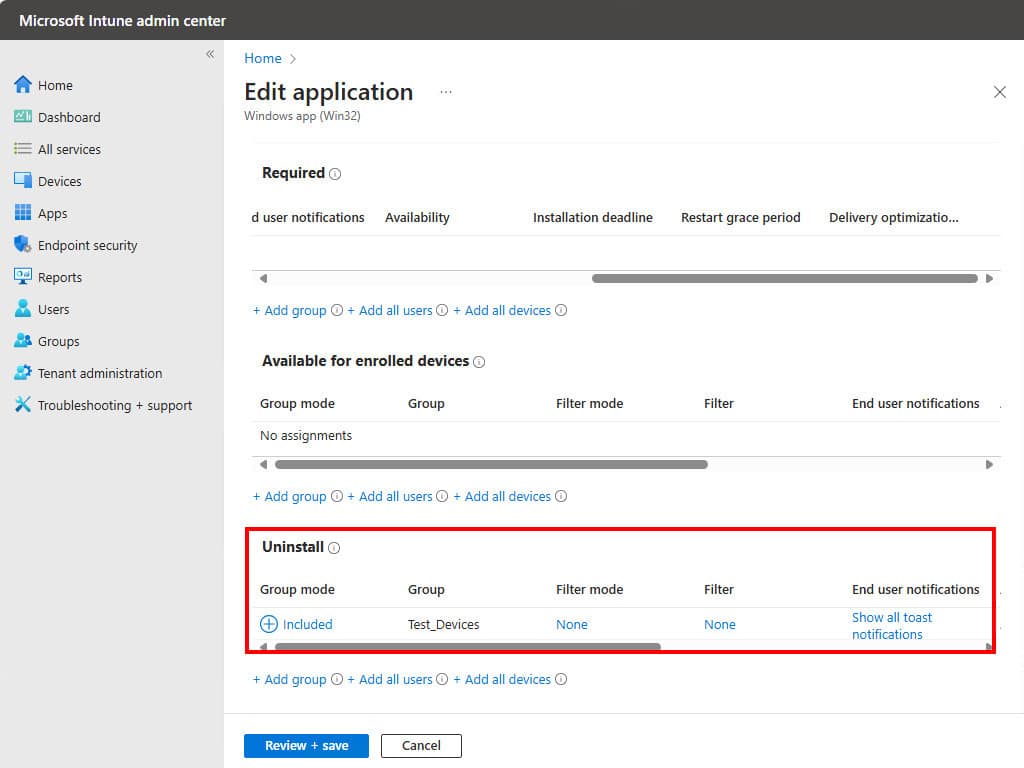
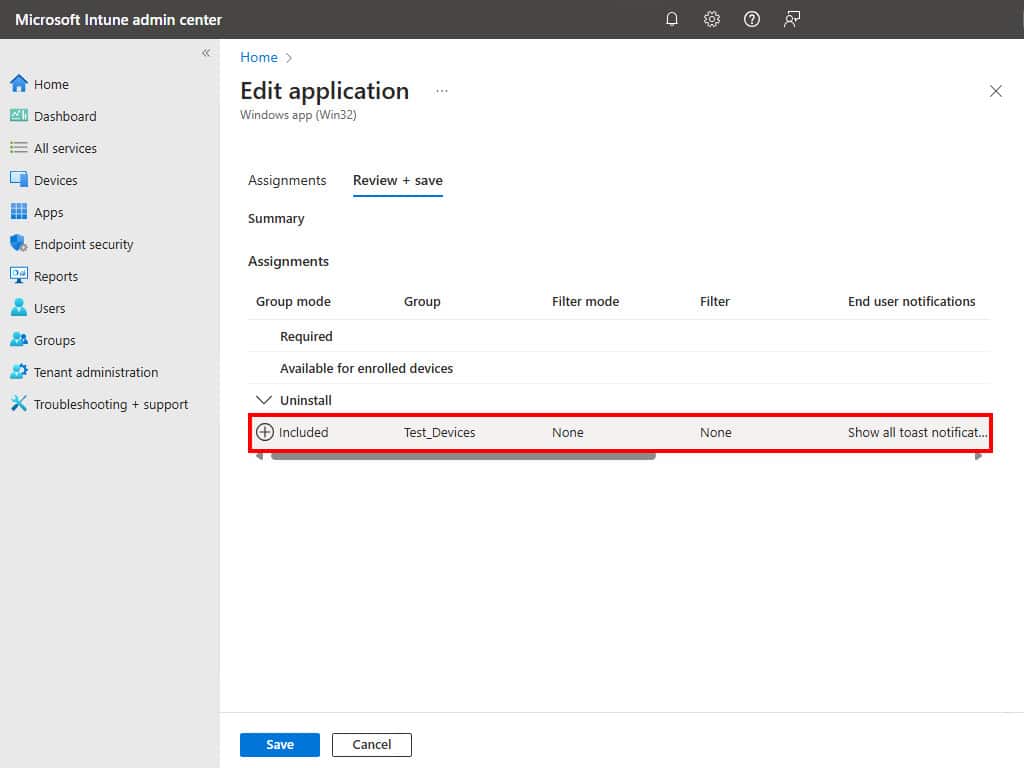
3. To uninstall the application, add a group in the Uninstall section. Ensure that the same user or device is not a part of the group which has been added to the Required section. For demo purpose, I’ve removed the test group from the Required section and add it into the Uninstall section.
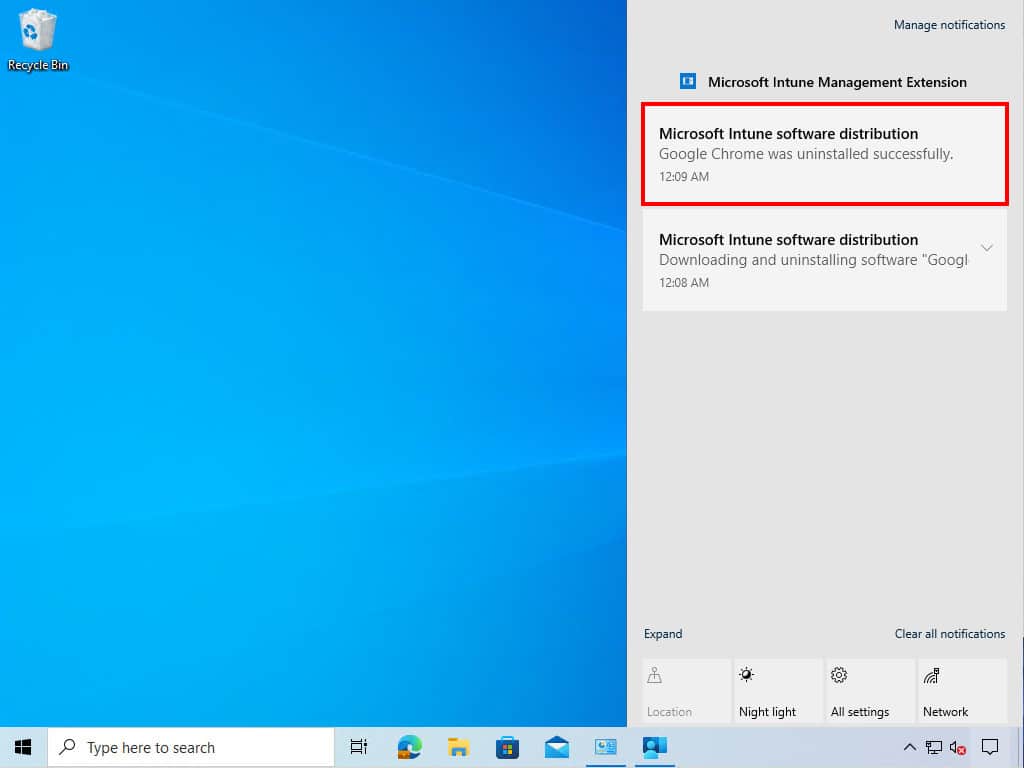
4. Wait for the next Intune device check-in, or sync it manually to automatically remove the app.
As you can see, the app has been removed from the device automatically.